
Flutter で表を作成するには、Table Widget を使用すれば作成できます。Column Widget と Row Widget を使用すれば、表形式に配置することはできますが、Table Widget を使用するとより簡単に表を作成できます。
基本的な使い方
Table Widget の子に、TableRow Widget を配置します。TableRow Widget が表の行になります。さらに、TableRow Widget に子に、表の列数分の Widget を配置します。配置する Widget は、テキスト、画像、ボタン等何でも良いです。
以下の例では、2行×3列の表に Text Widget を配置しています。
Table(
  children: <TableRow>[
    TableRow(
      children: <Widget>[
        Text("Cell(0,0)"),
        Text("Cell(0,1)"),
        Text("Cell(0,2)"),
      ],
    ),
    TableRow(
      children: <Widget>[
        Text("Cell(1,0)"),
        Text("Cell(1,1)"),
        Text("Cell(1,2)"),
      ],
    ),
  ],
),
列の設定
列幅
以下のように、Table Widget の columnWidths プロパティを使用することで、表の各列の幅を指定することができます。1列目の幅は、0: IntrinsicColumnWidth(), というように要素0で指定します。同様に、2列目は要素1、3列目は要素2、…で指定します。
Table(
  columnWidths: <int, TableColumnWidth>{
    0: IntrinsicColumnWidth(),
    1: FlexColumnWidth(2),
    2: FixedColumnWidth(100),
  },
  children: <TableRow>[
    TableRow(
      …
    ),
  ],
),
幅の指定方法には、以下のような種類があります。
- IntrinsicColumnWidth
その列のセル内にある Widget のサイズに応じて自動で列幅が決定 - FlexColumnWidth
列幅を指定した割合で固定 - FixedColumnWidth
列幅を指定した値で固定
行の設定
行の高さ
行の高さは、その内容に基づいて決まります。
よって、行の高さを指定する場合は、その行にある Widget の高さを変更します。
Table(
  children: <TableRow>[
    TableRow(
      children: <Widget>[
        SizedBox(
          height: 50,
          child: Text("Cell(0,0)"),
        ),
        Text("Cell(0,1)"),
        Text("Cell(0,2)"),
      ],
    ),
    TableRow(
      …
    ),
  ],
),
行のスタイル
TableRow の decoration プロパティで、行のスタイルを設定することができます。
下記の例では、行の背景色を黄色に設定しています。
Table(
  children: <TableRow>[
    TableRow(
      decoration: BoxDecoration(
        color: Colors.yellow,
      ),
      children: <Widget>[
        Text("Cell(0,0)"),
        Text("Cell(0,1)"),
        Text("Cell(0,2)"),
      ],
    ),
    TableRow(
      …
    ),
  ],
),
その他の設定
セル内の位置
TableCell の verticalAlignment プロパティを使用することで、セル内の Widget の位置を調整できます。
位置を調整したい Widget を TableCell の子要素にして使用します。
Table(
  children: const <TableRow>[
    TableRow(
      children: <Widget>[
        SizedBox(
          height: 50,
          child: Text("Cell(0,0)"),
        ),
        TableCell(
          verticalAlignment: TableCellVerticalAlignment.bottom,
          child: Text("Cell(0,1)"),
        ),
        Text("Cell(0,2)"),
      ],
    ),
    TableRow(
      …
    ),
  ],
)
表の罫線
Table の border プロパティで、表の罫線を設定することができます。
下記の例では、表の全ての箇所に、オレンジ色の罫線を表示しています。
Table(
  border: TableBorder.all(color: Colors.orange),
  children: const <TableRow>[
    TableRow(
      children: <Widget>[
        Text("Cell(0,0)"),
        Text("Cell(0,1)"),
        Text("Cell(0,2)"),
      ],
    ),
    TableRow(
      …
    ),
  ],
)
使用例
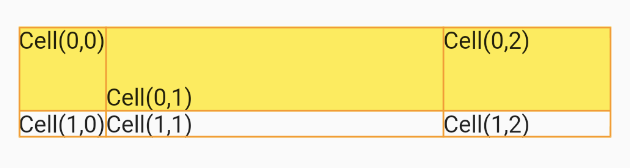
以下、上記の設定をまとめて使用した例と実際の表示結果です。
Table(
  border: TableBorder.all(color: Colors.orange),
  columnWidths: const <int, TableColumnWidth>{
    0: IntrinsicColumnWidth(),
    1: FlexColumnWidth(6),
    2: FixedColumnWidth(100),
  },
  children: const <TableRow>[
    TableRow(
      decoration: BoxDecoration(
        color: Colors.yellow,
      ),
      children: <Widget>[
        SizedBox(
          height: 50,
          child: Text("Cell(0,0)"),
        ),
        TableCell(
          verticalAlignment: TableCellVerticalAlignment.bottom,
          child: Text("Cell(0,1)"),
        ),
        Text("Cell(0,2)"),
      ],
    ),
    TableRow(
      children: <Widget>[
        Text("Cell(1,0)"),
        Text("Cell(1,1)"),
        Text("Cell(1,2)"),
      ],
    ),
  ],
),
まとめ
Flutter で、表を作成することができる Table Widget について紹介しました!
以上で、【Flutter】Table Widget で表を作成する は終わりです。