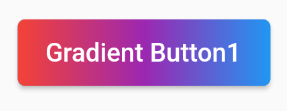
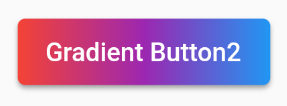
ボタンの背景をグラデーションにする方法を2種類紹介します。
ElevatedButton を使う方法
ElevatedButton の子Widget に、Inkを指定します。Ink を使うことで、Ink の子Widget である Container にもリップルエフェクトが適用されるようになります。
グラデーションの設定は、Ink の decoration に指定した BoxDecoration で行います。
この方法は、ElevatedButton の上に、ElevatedButtonと同じ形の グラデーションの壁紙 を貼り付けるイメージです。
ElevatedButton(
  onPressed: () {},
  child: Ink(
    decoration: BoxDecoration(
      gradient: const LinearGradient(
        colors: [Colors.red, Colors.purple, Colors.blue],
      ),
      borderRadius: BorderRadius.circular(4),
    ),
    child: Container(
      padding: const EdgeInsets.symmetric(vertical: 10, horizontal: 15),
      child: const Text('Gradient Button1'),
    ),
  ),
  style: ElevatedButton.styleFrom(
    padding: EdgeInsets.zero,
  ),
),
InkWell を使う方法
InkWell を使ってグラデーションボタンを作成する場合は、親Widget が Container になります。Container の decoration で、BoxDecoration を指定して、グラデーションを設定します。
InkWell の中で、表示するテキストや、タップしたときの動作を指定します。
この方法は、ボタンでないものをボタンのように見せて、グラデーション化しているイメージです。
Container(
  decoration: BoxDecoration(
    gradient: const LinearGradient(
        colors: [Colors.red, Colors.purple, Colors.blue],
    ),
    boxShadow: const [
      BoxShadow(
        color: Colors.grey,
        offset: Offset(0.0, 1.5),
        blurRadius: 1.5,
      ),
    ],
    borderRadius: BorderRadius.circular(4),
  ),
  child:Material(
    color: Colors.transparent,
    child: InkWell(
      onTap: () {},
      child: Container(
        padding: const EdgeInsets.symmetric(vertical: 10, horizontal: 15),
        child: const Text(
          'Gradient Button2',
          style: TextStyle(
            color: Colors.white,
            fontWeight: FontWeight.w500,
          ),
        ),
      ),
    ),
  ),
),
どちらを使えばいい?
どちらも同じように作成できたので、どちらを使ったらいいか迷うかもしません。
違いとしては、リップルエフェクトの挙動です。InkWell で作ると、ElevatedButton で作ったものより、リップルエフェクトが速いです。そのため、通常の ElevatedButton と合わせて使用する場合は、ElevatedButton でグラデーションボタンを作る方が統一されて良いと思います。
一方、InkWell で作ったものは、ボタンのように見せかけているだけです。そのため、形など色々カスタマイズしたい場合は、 InkWell で作る方が簡単だと思います。
まとめ
背景がグラデーションのボタンを作成する方法を2種類紹介しました!
以上で、【Flutter】グラデーションボタンを作成する方法 は終わりです。

