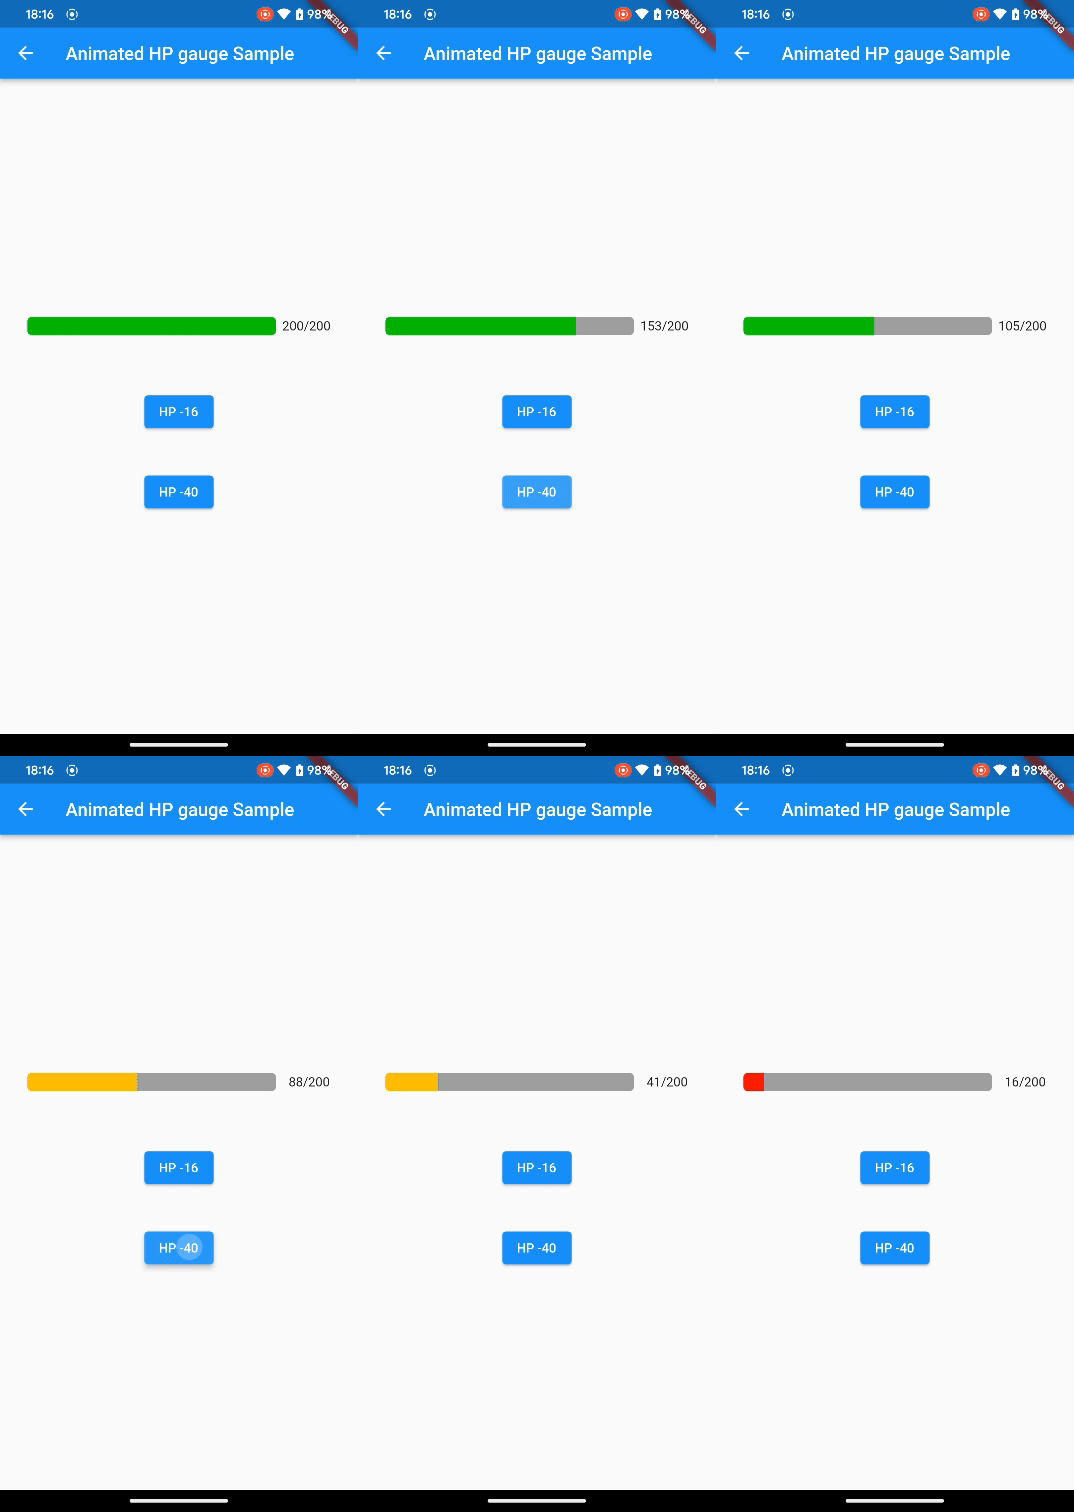
今回は、以下の記事でつくった HP ゲージに、ダメージが入ると少しずつHPが削られていくようなアニメーションをつけてみました!
そのソースコードと解説、使い方を紹介します!
アニメーション付HPゲージ
ソースコード
以下がアニメーション付のHPゲージを AnimatedHpGauge として独自 Widget 化したソースコードです。
HPが減ると少しずつゲージとHPの表示テキストが減っていくようになっています。
class AnimatedHpGauge extends StatefulWidget {
  const AnimatedHpGauge({
    required this.maxHp,
    Key? key
  }) : super(key: key);

  final int maxHp;

  @override
  State<AnimatedHpGauge> createState() => AnimatedHpGaugeState();
}

class AnimatedHpGaugeState extends State<AnimatedHpGauge> with SingleTickerProviderStateMixin {
  late AnimationController _controller;
  late Animation<double> _animation;

  @override
  void initState() {
    super.initState();
    _controller = AnimationController(
      vsync: this,
      duration: const Duration(seconds: 1),
    );
    _animation = Tween(begin: 1.0, end: 1.0).animate(CurvedAnimation(
      parent: _controller,
      curve: Curves.easeInOut,
    ));
  }

  @override
  void dispose() {
    _controller.dispose();
    super.dispose();
  }

  @override
  Widget build(BuildContext context) {
    return AnimatedBuilder(
      animation: _controller,
      builder: (context, child) {
        return Row(
          children: [
            Expanded(
              child: ClipRRect(
                borderRadius: const BorderRadius.all(Radius.circular(5)),
                child: LinearProgressIndicator(
                  value: _animation.value,
                  valueColor: AlwaysStoppedAnimation(_getCurrentHpColor(_animation.value)),
                  backgroundColor: Colors.grey,
                  minHeight: 20,
                ),
              ),
            ),
            Text('${_getCurrentHp().toString().padLeft(4, '  ')}/${widget.maxHp}'),
          ],
        );
      },
    );
  }

  void startAnimation(int damage) {
    _animation = Tween<double>(
      begin: _animation.value,
      end: (_getCurrentHp() - damage) / widget.maxHp,
    ).animate(CurvedAnimation(
      parent: _controller,
      curve: Curves.easeInOut,
    ));
    _controller.forward(from: 0.0);
  }

  int _getCurrentHp() {
    return (_animation.value * widget.maxHp).toInt();
  }

  Color _getCurrentHpColor(double hp) {
    if (hp > 1 / 2) {
      return const Color(0xFF00D308);
    }
    if (hp > 1 / 5) {
      return const Color(0xFFFFC107);
    }
    return const Color(0xFFFF0707);
  }
}
使用例
AnimatedHpGauge を使用した例が以下になります。
ボタンを押すと、ボタンに記載の分だけHPが減っていくようにしてみました。
class AnimatedHpGaugePage extends StatefulWidget {
  const AnimatedHpGaugePage({Key? key}) : super(key: key);

  @override
  State<AnimatedHpGaugePage> createState() => _AnimatedHpGaugePageState();
}

class _AnimatedHpGaugePageState extends State<AnimatedHpGaugePage> {
  final int maxHp = 200;

  @override
  Widget build(BuildContext context) {
    final _animatedHpGageKey = GlobalObjectKey<AnimatedHpGaugeState>(context);

    return Scaffold(
        appBar: AppBar(
          title: const Text("Animated HP gauge Sample"),
        ),
        body: Column(
          mainAxisAlignment: MainAxisAlignment.center,
          children: [
            Padding(
              padding: const EdgeInsets.all(30),
              child: AnimatedHpGauge(key: _animatedHpGageKey, maxHp: maxHp),
            ),
            Padding(
              padding: const EdgeInsets.all(30),
              child: ElevatedButton(
                onPressed: (){
                  setState(() {
                    _animatedHpGageKey.currentState?.startAnimation(16);
                  });
                },
                child: const Text('HP -16'),
              ),
            ),
            Padding(
              padding: const EdgeInsets.all(10),
              child: ElevatedButton(
                onPressed: (){
                  setState(() {
                    _animatedHpGageKey.currentState?.startAnimation(40);
                  });
                },
                child: const Text('HP -40'),
              ),
            ),
          ],
        )
    );
  }
}
解説
独自 Widget クラスのプロパティ・状態
まず、AnimatedHpGauge のプロパティは、maxHPのみです。このプロパティは、最大HPの値を設定します。
また、AnimatedHpGaugeState で、アニメーションを管理する AnimationController と 具体的なアニメーションを設定する Animation をそれぞれ _controller、_animation で持っています。
アニメーションを付けるための設定
アニメーションを付けるための設定を行なっているのが、主に以下の部分になります。
まず、1行目で with SingleTickerProviderStateMixin とすることにより、アニメーションを付けるために必要な AnimationController を簡単に初期化、管理できるようにしています。
そして、initState 時に、AnimationController の設定を行なっています。(8〜11行目)
ここでは、アニメーション時間を1秒に設定しています。
また、具体的なアニメーションの初期設定を12〜15行目で行なっています。
今回は、曲線的な変化でアニメーションを行う Curves.easeInOut でアニメーションするようにしました。
class AnimatedHpGaugeState extends State<AnimatedHpGauge> with SingleTickerProviderStateMixin {
  late AnimationController _controller;
  late Animation<double> _animation;

  @override
  void initState() {
    super.initState();
    _controller = AnimationController(
      vsync: this,
      duration: const Duration(seconds: 1),
    );
    _animation = Tween(begin: 1.0, end: 1.0).animate(CurvedAnimation(
      parent: _controller,
      curve: Curves.easeInOut,
    ));
  }

  …
}
今回使用した Curves.easeInOut 以外にも、曲線的な変化でアニメーションするものがたくさんあります。詳細は以下をご参考ください。
https://api.flutter.dev/flutter/animation/Curves-class.html
HPゲージのアニメーション表示
HPゲージの量、色、HPのテキストをアニメーション表示させているのが以下の部分です。
AnimatedBuilder 内の Widget がアニメーション対象になります。
@override
Widget build(BuildContext context) {
  return AnimatedBuilder(
    animation: _controller,
    builder: (context, child) {
      return Row(
        children: [
          Expanded(
            child: ClipRRect(
              borderRadius: const BorderRadius.all(Radius.circular(5)),
              child: LinearProgressIndicator(
                value: _animation.value,
                valueColor: AlwaysStoppedAnimation(_getCurrentHpColor(_animation.value)),
                backgroundColor: Colors.grey,
                minHeight: 20,
              ),
            ),
          ),
          Text('${_getCurrentHp().toString().padLeft(4, '  ')}/${widget.maxHp}'),
        ],
      );
    },
  );
}
HPゲージの値の設定
HPゲージは、LinearProgressIndicator をベースに作成しています。
バーの進捗がアニメーションで動くようにするため、value プロパティには、_animated.value を設定います。_animation.value が、現在のアニメーション値(0.0〜1.0)を表しており、LinearProgressIndicator の value プロパティも0.0〜1.0で進捗を設定するので、_animation.value をそのまま設定しています。
バーの色を設定する valueColor プロパティでは、現在のアニメーション値(進捗)に応じて色が切り替わるように設定しています。
以下の _getCurrentHpColor メソッドを使用して、アニメーション値に応じたバーの色を決めています。
Color _getCurrentHpColor(double hp) {
  if (hp > 1 / 2) {
    return const Color(0xFF00D308);
  }
  if (hp > 1 / 5) {
    return const Color(0xFFFFC107);
  }
  return const Color(0xFFFF0707);
}
HPテキストの値の設定
HPを「現在のHP/最大HP」の形でテキスト表示しているのが、以下の部分です。ここも現在のHPがアニメーションするようにしています。
Text('${_getCurrentHp().toString().padLeft(4, ' ')}/${widget.maxHp}')現在のHPは、_getCurrentHp メソッドで取得しています。
_animation.value が、現在のアニメーション値(0.0〜1.0)を表しているので、この値に maxHp を掛けることにより、現在のHPを取得しています。
また、toInt() で、int 型への変換も行なっています。
このようにすることで、アニメーションの動きにあわせて、0〜maxHp の範囲でHPが取れます。
int _getCurrentHp() {
  return (_animation.value * widget.maxHp).toInt();
}
アニメーションの実行
アニメーション実行メソッド
アニメーションを実行させる部分が以下の startAnimation メソッドです。
Tween を使用して、アニメーションの開始地点と終了地点を設定しています。
開始地点は、現在HPのアニメーション値なので _animation.value を指定し、
終了地点は、ダメージが引かれた後のHPのアニメーション値なので、(_getCurrentHp() - damage) / widget.maxHp を指定しています。maxHp で除算することで、0.0〜1.0の範囲にしています。
最後に、AnimationController の forward メソッドを使ってアニメーションを開始させています。
void startAnimation(int damage) {
  _animation = Tween<double>(
    begin: _animation.value,
    end: (_getCurrentHp() - damage) / widget.maxHp,
  ).animate(CurvedAnimation(
    parent: _controller,
    curve: Curves.easeInOut,
  ));
  _controller.forward(from: 0.0);
}
親 Widget からアニメーション実行
親 Widget の方で、GlobalObjectKey を使用することで、子 Widget である AnimatedHpGauge の startAnimation メソッドを呼び出して、アニメーション実行が可能です。
このように GlobalObjectKey を使用するため、AnimatedHpGaugeState は、private にしていません。private にすると AnimatedHpGaugeState を参照できなくなるためです。
まとめ
Flutterで、アニメーション付のHPゲージをつくってみて、そのソースコードを解説をしました!
使ってみたい方は、コピペして、アニメーションの動きや時間等変更して使ってみてください。
以上で、【Flutter】AnimationController でアニメーション付のHPゲージをつくってみた は終わりです。


