
Flutter で画面下部にタブを表示するには、BottomNavigationBar を使用します。今回は、この BottomNavigationBar を使用してタブでページを切り替えられうようにする方法を紹介します!
BottomNavigationBar の使い方
bottomNavigationBar は、appBar と同様に、Scaffold のプロパティとして設定できます。
基本形は、以下のソースコードのようになります。
items プロパティで、各タブを設定します。currentIndex プロパティで、表示するタブを指定します。onTap プロパティで、タブ押下時の動作を設定できます。
class BottomTabBarSample extends StatefulWidget {
  const BottomTabBarSample({Key? key}) : super(key: key);

  @override
  State<BottomTabBarSample> createState() => _BottomTabBarSampleState();
}

class _BottomTabBarSampleState extends State<BottomTabBarSample> {
  int _currentIndex = 0;

  @override
  Widget build(BuildContext context) {
    return Scaffold(
      appBar: …,
      body: …,
      bottomNavigationBar: BottomNavigationBar(
        items: const [
          BottomNavigationBarItem(icon: Icon(Icons.home), label: 'Home'),
          BottomNavigationBarItem(icon: Icon(Icons.chat), label: 'Chat'),
          BottomNavigationBarItem(icon: Icon(Icons.search), label: 'Search'),
          BottomNavigationBarItem(icon: Icon(Icons.settings), label: 'Settings'),
        ],
        currentIndex: _currentIndex,
        onTap: (int index) {
          setState(() {
            _currentIndex = index;
          });
        },
      ),
    );
  }
}
タブアイテムのアイコン
Flutter には、アイコンがたくさん用意されていますが、その中からタブに使用したいアイコンを探す場合は、以下のページで探すことができます。
タブのカスタマイズ
bottomNavigationBar の他のプロパティで文字色や背景色等のデザインをカスタマイズできます。
デザインに関する bottomNavigationBar のプロパティを以下の表に示します。
| プロパティ | 説明 |
| type | タブのレイアウトと動作 を設定 |
| backgroundColor | タブの背景色 を設定 |
| selectedFontSize | 選択しているアイテムのフォントサイズ を設定 |
| selectedIconTheme | 選択しているアイテムの IconTheme を設定 |
| selectedLabelStyle | 選択しているアイテムのラベルの TextStyle を設定 |
| selectedItemColor | 選択しているアイテムの色(アイコン、ラベル両方)を設定 |
| unselectedFontSize | 選択されていないアイテムのフォントサイズを 設定 |
| unselectedIconTheme | 選択されていないアイテムの IconTheme を設定 |
| unselectedLabelStyle | 選択されていないアイテムのラベルの TextStyle を設定 |
| unselectedItemColor | 選択されていないアイテムの色(アイコン、ラベル両方)を設定 |
| iconSize | アイコンのサイズ を設定 |
タブでページを切り替えられるようにする方法
事前準備
予めタブ切り替えで表示するページを独自の Widget クラスとして作成しておきましょう。
以下は、ページを構成するクラスのソースコード例です。
class TabSamplePage extends StatelessWidget {
  final String pageName;

  const TabSamplePage(this.pageName, {Key? key}) : super(key: key);

  @override
  Widget build(BuildContext context) {
    return Scaffold(
      body: Center(
        child: Text(pageName,
          style: const TextStyle(fontSize: 40),
        ),
      ),
    );
  }
}
独自 Widget クラスの作成方法については、以下の記事でも紹介していますので、詳しく知りたい方はご参照ください。
タブとページを連動させる
表示するページを準備できたら、各タブとページを連動させましょう。
以下のソースコード10行目のように、ページリストを作成します。そして、23行目のように body に _pages.elementAt(_currentIndex) のように指定してあげれば良いです。_pages.elementAt(_currentIndex) で、_pages の中から、_currentIndex(現在選択中のタブ番号)が示すページを取得できます。
class BottomTabBarSample extends StatefulWidget {
  const BottomTabBarSample({Key? key}) : super(key: key);

  @override
  State<BottomTabBarSample> createState() => _BottomTabBarSampleState();
}

class _BottomTabBarSampleState extends State<BottomTabBarSample> {
  int _currentIndex = 0;
  final _pages = [
    const TabSamplePage('Home'),
    const TabSamplePage('Chat'),
    const TabSamplePage('Search'),
    const TabSamplePage('Settings')
  ];

  @override
  Widget build(BuildContext context) {
    return Scaffold(
      appBar: AppBar(
        …,
      ),
      body: _pages.elementAt(_currentIndex),
      bottomNavigationBar: BottomNavigationBar(
        items: const [
          BottomNavigationBarItem(icon: Icon(Icons.home), label: 'Home'),
          BottomNavigationBarItem(icon: Icon(Icons.chat), label: 'Chat'),
          BottomNavigationBarItem(icon: Icon(Icons.search), label: 'Search'),
          BottomNavigationBarItem(icon: Icon(Icons.settings), label: 'Settings'),
        ],
        currentIndex: _currentIndex,
        onTap: (int index) {
          setState(() {
            _currentIndex = index;
          });
        },
      ),
    );
  }
}
実装例
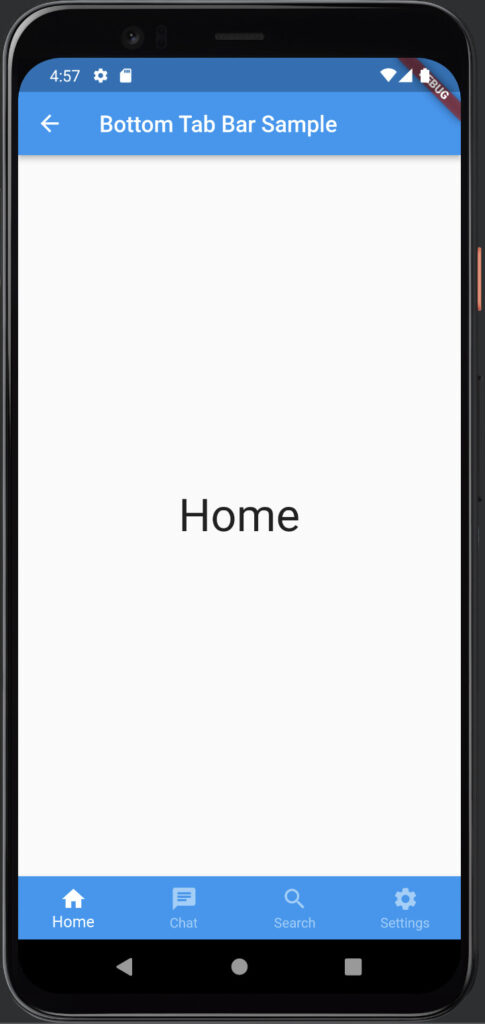
最後に、画面下部のタブでページを切り替え可能にする実装のソースコード例を以下に紹介します。
class BottomTabBarSample extends StatefulWidget {
  const BottomTabBarSample({Key? key}) : super(key: key);

  @override
  State<BottomTabBarSample> createState() => _BottomTabBarSampleState();
}

class _BottomTabBarSampleState extends State<BottomTabBarSample> {
  int _currentIndex = 0;
  final _pages = [
    const TabSamplePage('Home'),
    const TabSamplePage('Chat'),
    const TabSamplePage('Search'),
    const TabSamplePage('Settings')
  ];

  @override
  Widget build(BuildContext context) {
    return Scaffold(
      appBar: AppBar(
        title: const Text("Bottom Tab Bar Sample"),
      ),
      body: _pages.elementAt(_currentIndex),
      bottomNavigationBar: BottomNavigationBar(
        items: const [
          BottomNavigationBarItem(icon: Icon(Icons.home), label: 'Home'),
          BottomNavigationBarItem(icon: Icon(Icons.chat), label: 'Chat'),
          BottomNavigationBarItem(icon: Icon(Icons.search), label: 'Search'),
          BottomNavigationBarItem(icon: Icon(Icons.settings), label: 'Settings'),
        ],
        currentIndex: _currentIndex,
        onTap: (int index) {
          setState(() {
            _currentIndex = index;
          });
        },
        selectedItemColor: Colors.white,
        unselectedItemColor: Colors.white54,
        backgroundColor: Colors.blue,
        type: BottomNavigationBarType.fixed,
      ),
    );
  }
}
まとめ
画面下のタブでページを切り替えられるようにする方法を紹介しました!
以上で、【Flutter】画面下部のタブでページを切り替え可能にする方法 は終わりです。