今回は、Flutter アプリの画面の向きを変更・固定する方法を紹介します。
画面の向きを変更する方法
まず、特定の画面の向きを変更したい場合についてです。
画面の向きを変更するには、service.dart をインポートして、
SystemChrome.setPreferredOrientations で画面の向きを指定します。
import 'package:flutter/services.dart';

// 縦向きに変更
SystemChrome.setPreferredOrientations([
  DeviceOrientation.portraitDown,
  DeviceOrientation.portraitUp
]);

// 横向きに変更
SystemChrome.setPreferredOrientations([
  DeviceOrientation.landscapeLeft,
  DeviceOrientation.landscapeRight
]);
画面の向きを固定する方法
次に、アプリの基本設定として、画面の向きを固定する場合を紹介します。
iPad の場合は、別途追加の対応が必要ですので、iPad 以外の場合と iPad に分けて見ていきます。
iPad 以外
画面の向きを固定する場合は、main.dart に以下のように記述します。
WidgetsFlutterBinding.ensureInitialized() を忘れずに記述しておいてください。
import 'package:flutter/services.dart';

void main() {
  WidgetsFlutterBinding.ensureInitialized();
  SystemChrome.setPreferredOrientations([
    // 縦向き
    DeviceOrientation.portraitUp,
    DeviceOrientation.portraitDown,
  ]).then((_) {
    runApp(const MyApp());
  });
}
iPad の場合の対応
iPad の場合は、上記の設定だけを行っても固定が効かず、全ての向きに回転してしまいます。
そのため、iPad は追加で画面の向きを固定する設定を行います。
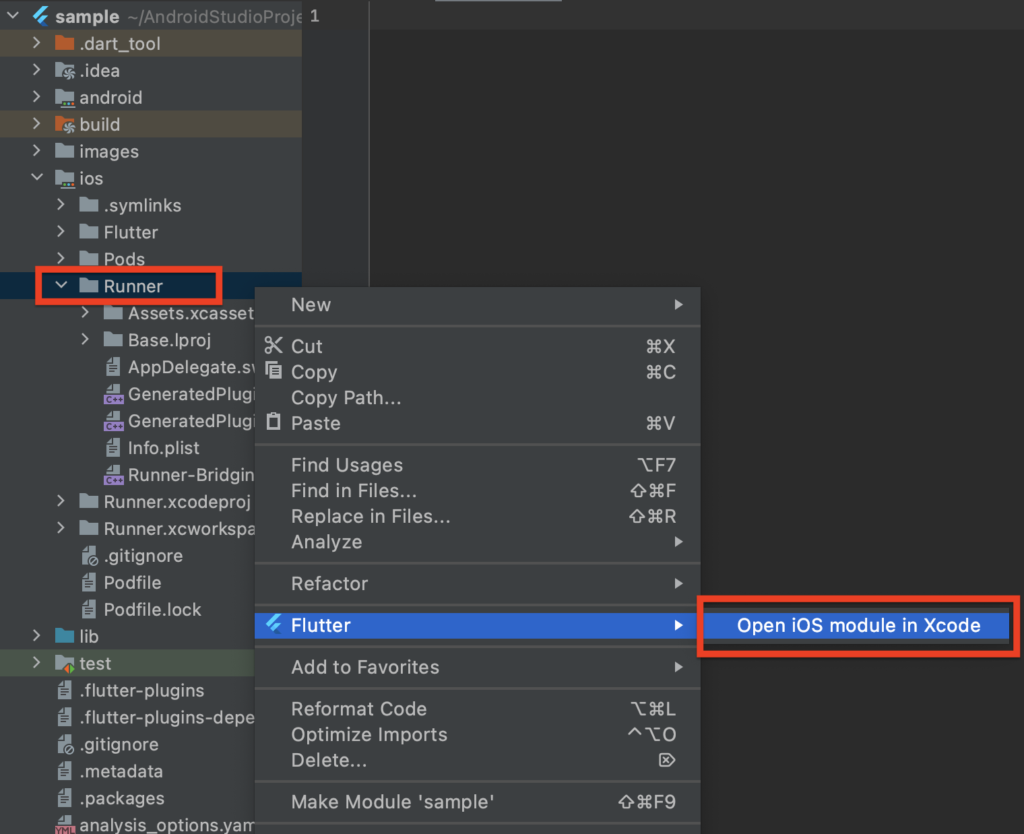
ios > Runnner を右クリックして、「Flutter」>「Open iOS module in Xcode」をクリックします。

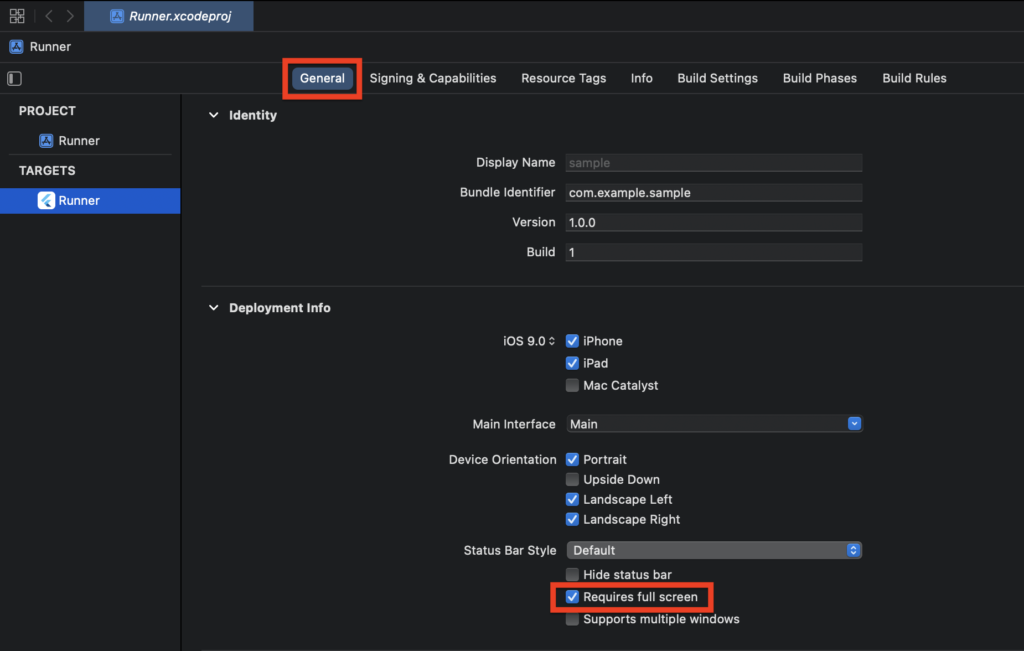
Xcode で設定画面が開くので、General > Deployment にある「Requires full screen」にチェックを入れます。

これで iPad でも画面の向きが固定されるようになります。
ただし、マルチタスク機能が非対応になるので、ご注意ください。
まとめ
Flutter で画面の向きを変更・固定する方法を紹介しました!
- service.dart パッケージの SystemChrome.setPreferredOrientations で画面の向きを指定することができます。
- アプリの基本設定として、画面の向きを固定する場合は、main.dart に記述します。
- 画面の向きの固定を iPad でも行う場合は、追加で設定が必要です。
Xcode から、Requires full screen にチェックをつけましょう。
以上で、【Flutter】画面の向きを変更・固定する方法 は終わりです。


コメント